Stretch Developer

Taking urban development into our own hands

  • Home
  • About
  • The Project
    • Finding a Property
    • Design
    • Approvals
    • Financing
    • Construction
    • Performance
  • Blog
  • Contact
  • Rental Suite

New Uses for Old Wood Part 2

September 26, 2021 by clove Leave a Comment

We continue to pick away at the beautiful fir reclaimed from our old house. And by we, I mean that I periodically check in on the “things to finish” list and Matt does the actual picking away. What can I say, we manage to our strengths. There would be about as much sense in me constructing things out of wood as there would be in Matt doing our taxes.

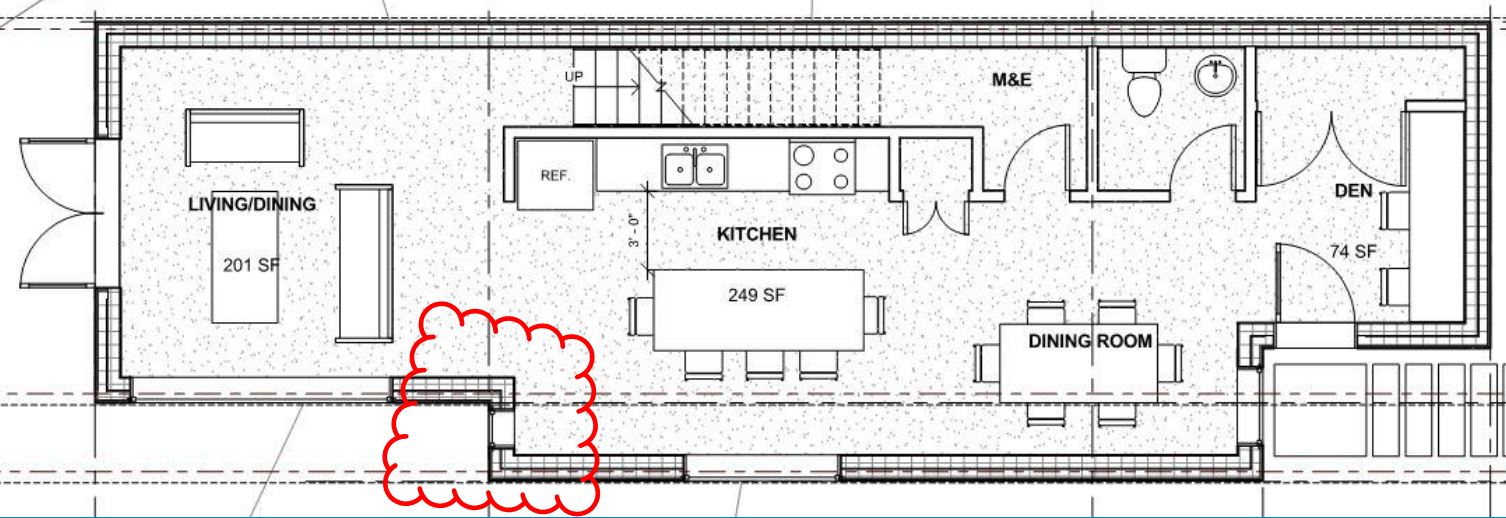
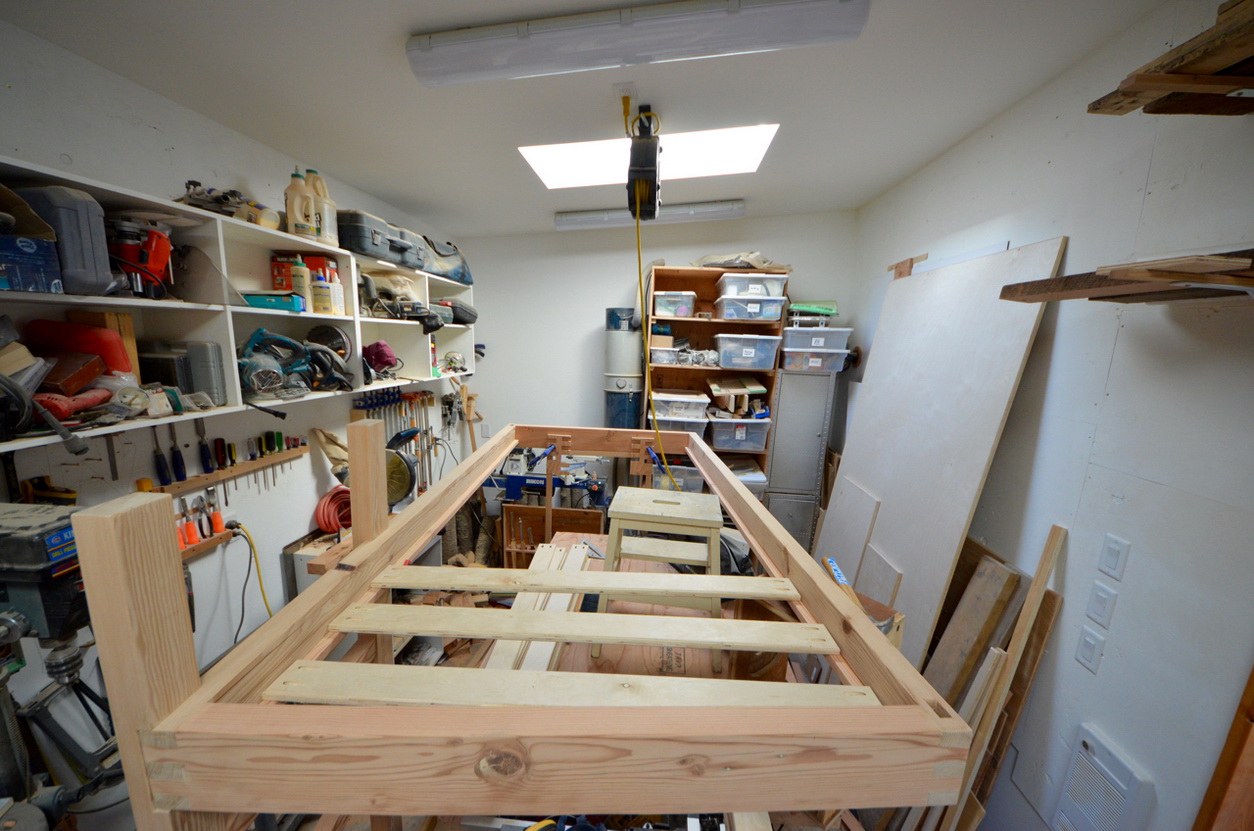
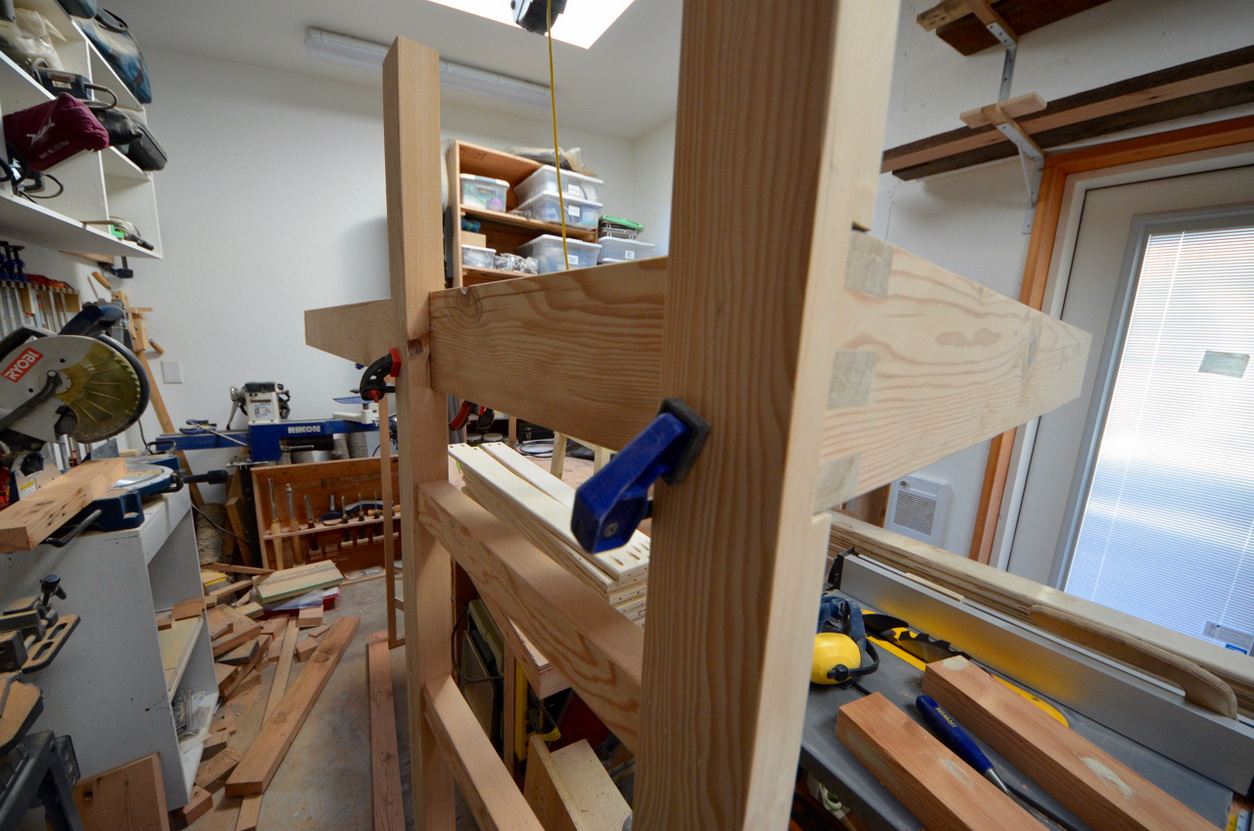
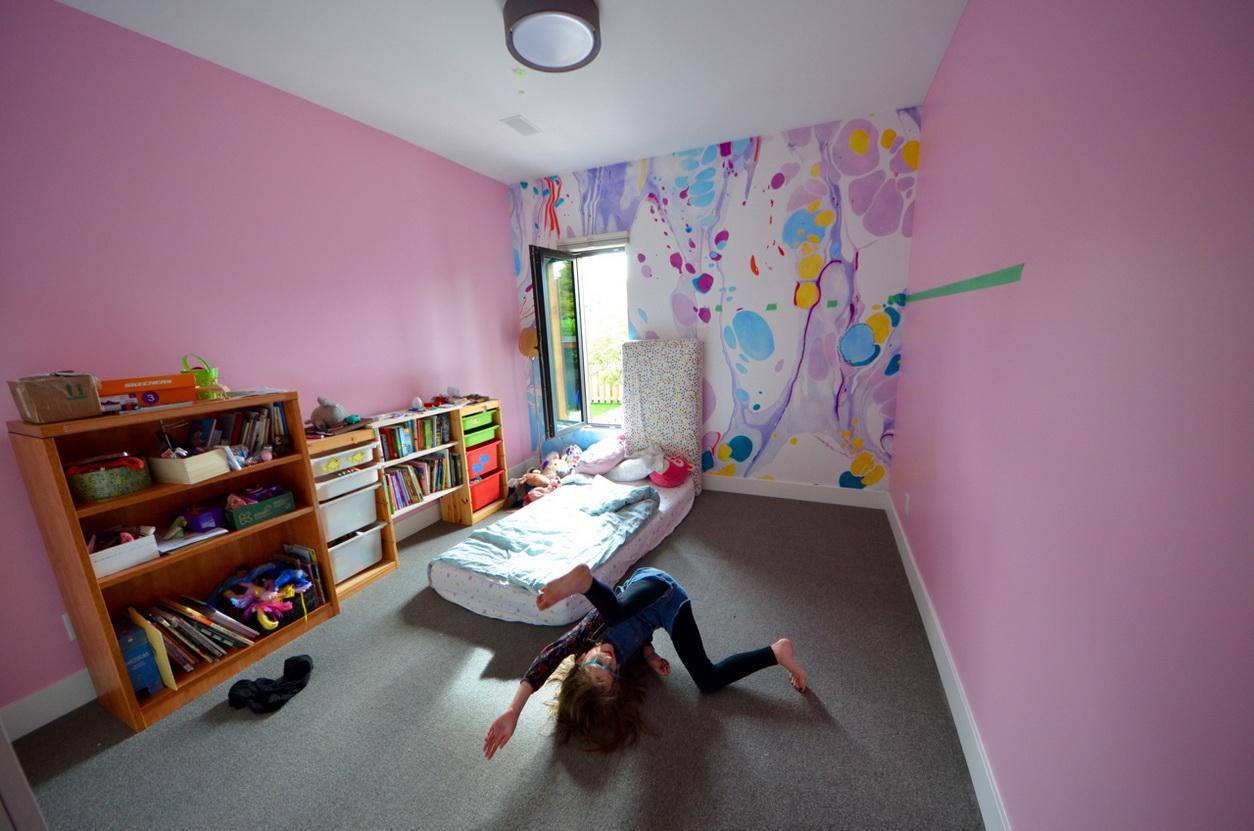
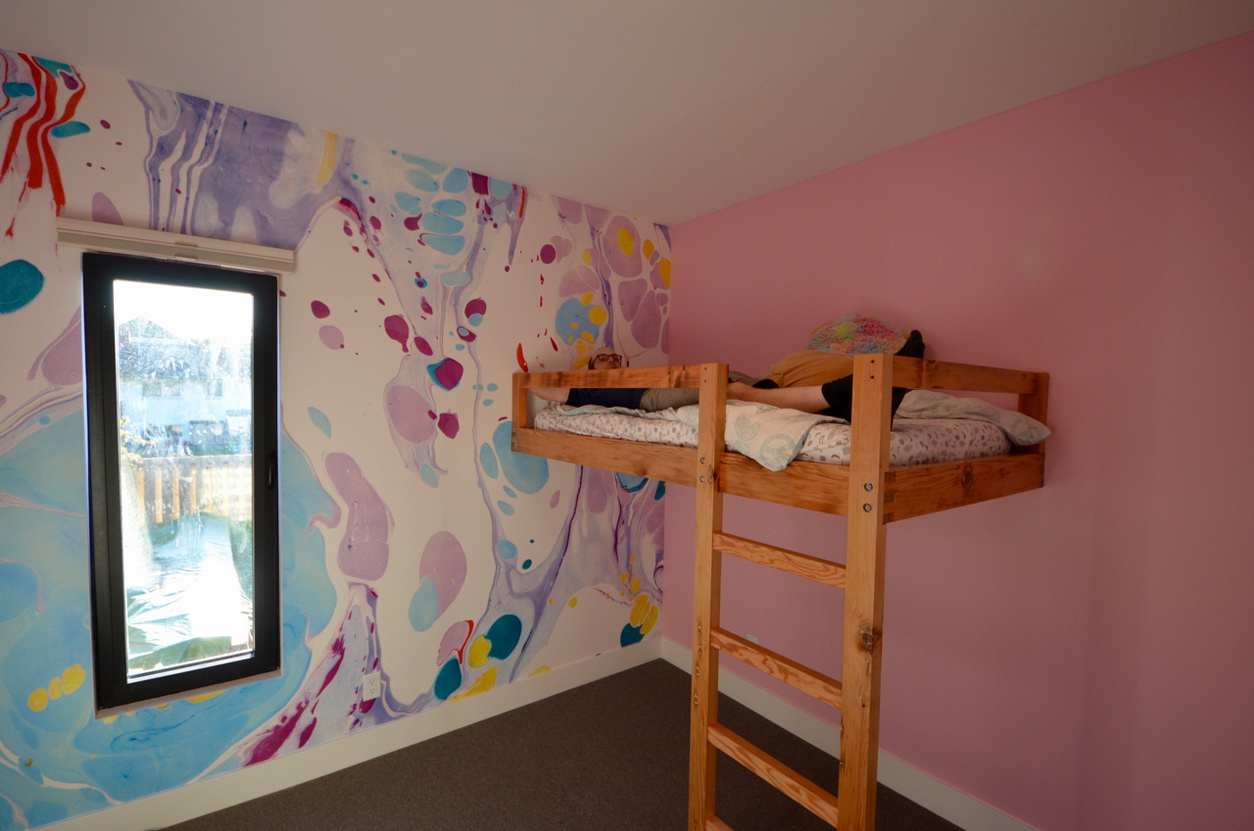
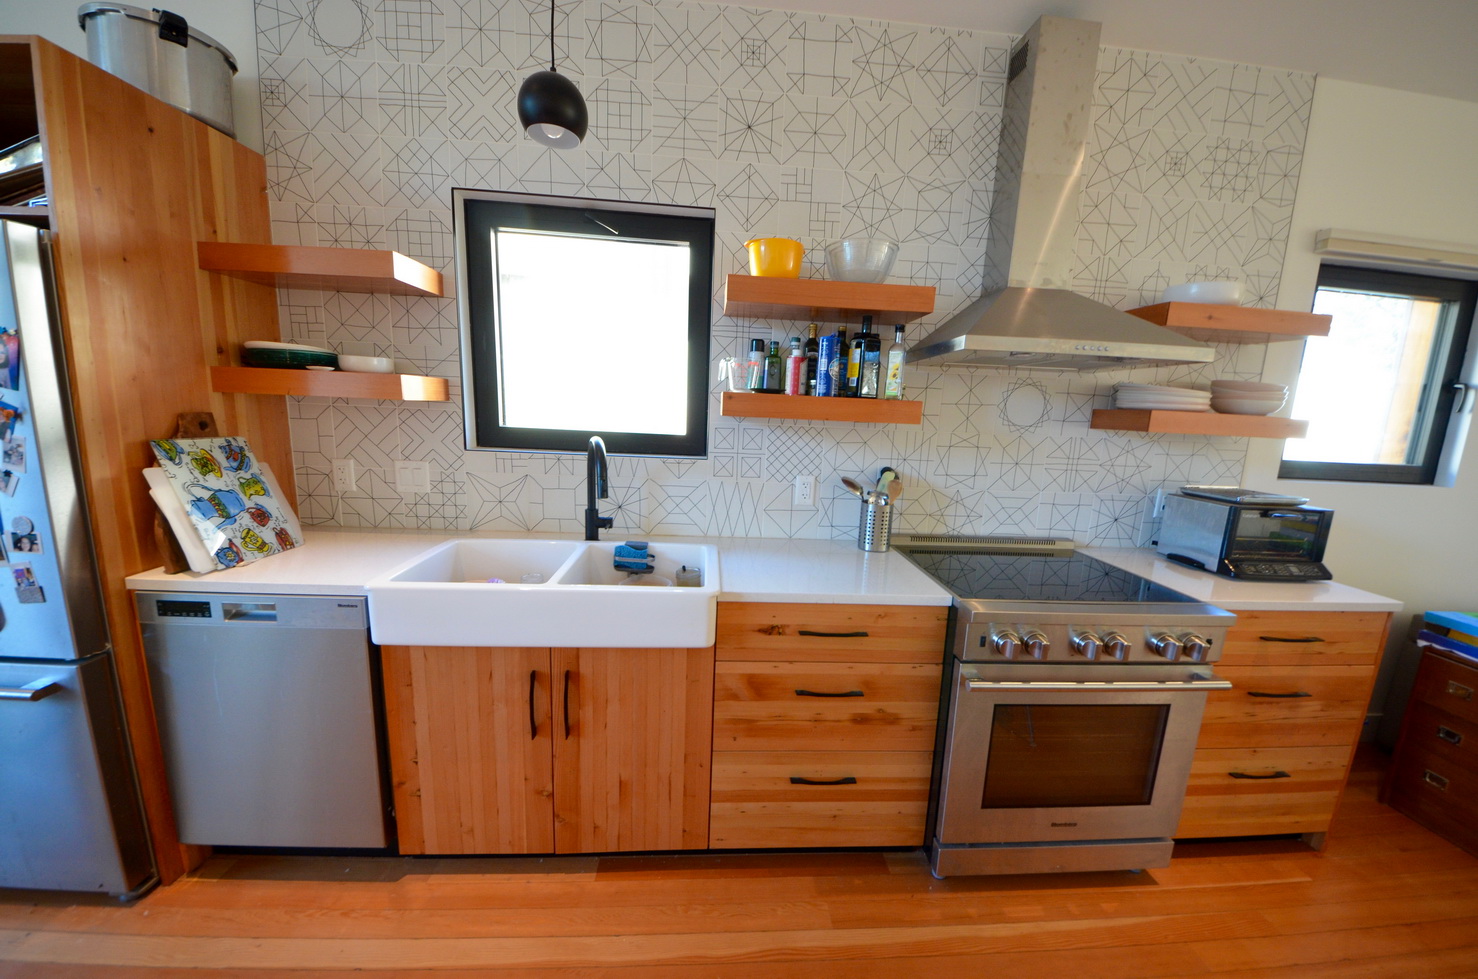
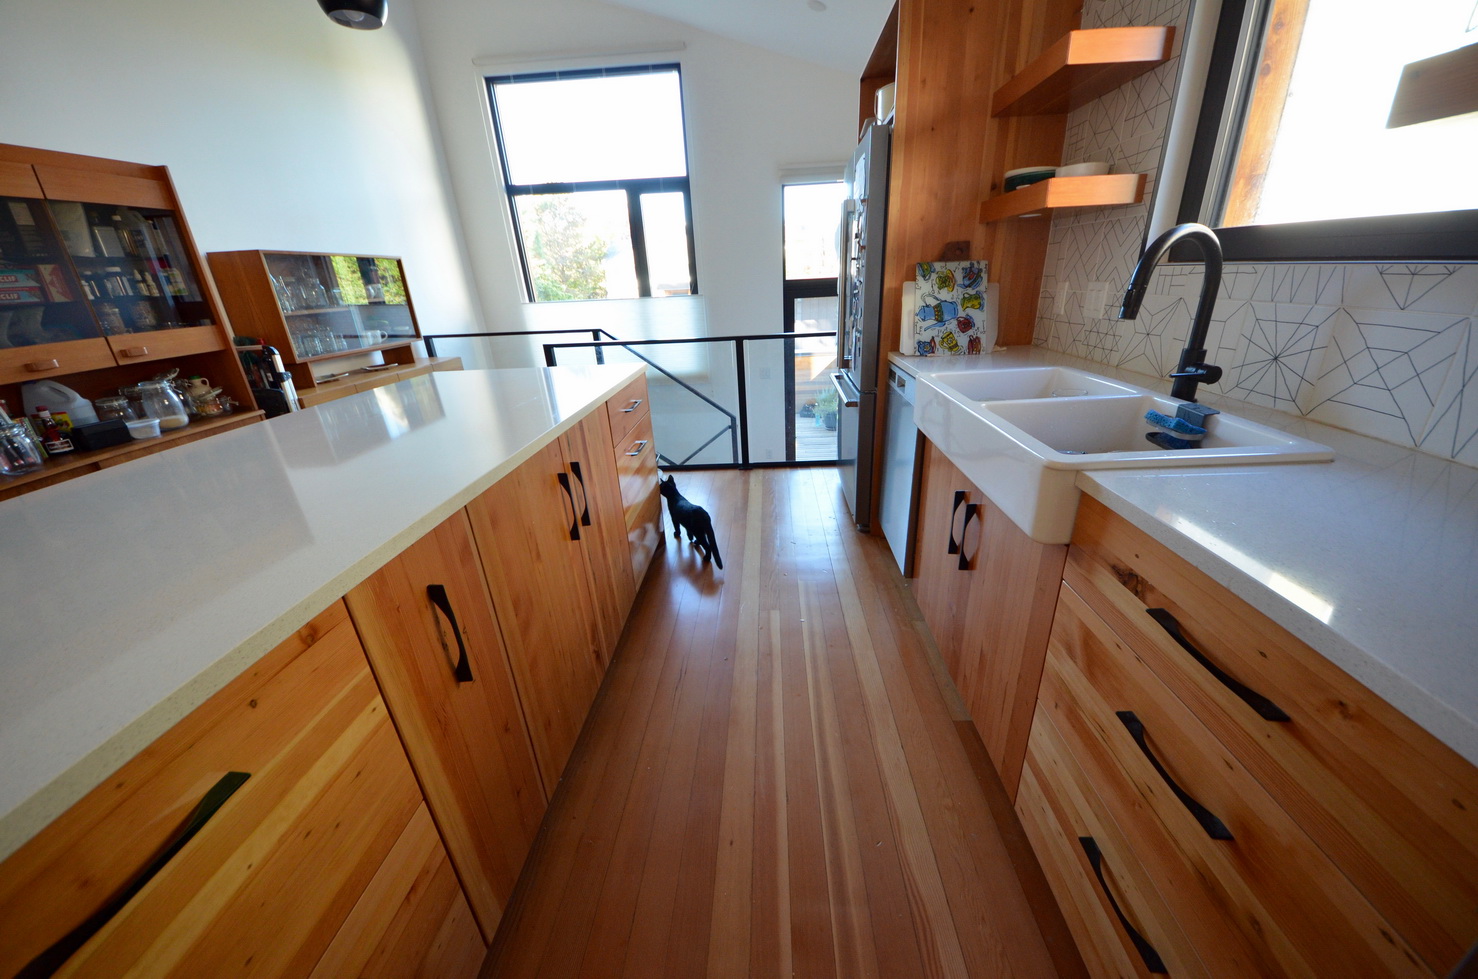
This installment has Matt making a gravity defying bunk bed for our daughter and finishing up the kitchen cabinets. I’d gotten used to pulling kitchen drawers open by the plywood box. Entirely functional, right? Then they got fronts and handles and it was a small revelation: hey that looks good and these handle thingees work pretty well!

bunk bed taking shape
joint detail
of course, before installing the bunk bed, the walls had to be decorated
and the bed takes flight! admittedly I still occasionally imagine catastrophic structural collapse, but at least we’d be falling on a mattress right?
kitchen cabinets!

If you missed the first installment of New Uses for Old Wood, you can find it here.

Filed Under: Construction, Design, Featured Tagged With: reclaimed wood construction

Making Lemonade (and Cabinets)

May 17, 2019 by clove Leave a Comment

I am convinced that one must be a dogged optimist to be a developer, as the actual completion of a project is simply the cumulative result of having solved innumerable problems along the way. If one stops believing that each new problem has a solution, the project dies.

And so it is with this spirit that we have made the most of our time waiting (and waiting…) for our new Development Permit. Here are a couple of big items we’ve been working on:

Interior Design

We hired an interior designer (welcome to the team, Lisa Dunsmuir of Step One Design!). We’d originally designed around the existing interior walls of our house because we were going to keep them. With that constraint gone, Lisa did a major redo that we think is a big improvement. She still had plenty of constraints to work with, mind you, given that all the windows, doors and ground level plumbing connections were already installed.

The biggest change to our half was to create a more distinct “front of house” (kitchen, living, entry) and “back of house” (bedrooms, bath) on the upper floor:

She also reworked our “mom suite” layout to be more functional:

On the other half, the biggest change was to rejig the upper floor to add an ensuite bath for the master bedroom (which we’re told people like):

We are now in the process of finalizing all finishes (carpet, tile, flooring, toilets, sinks, lighting etc). This has taken a surprising amount of time and now that we’ve gotten through most of it, I am grateful that we won’t be making these choices on the fly and trying to visualize how it will all work together on our own. The number of options in any one finish category is mind-boggling, and having Lisa funnel us into a just a few good ones has been incredibly valuable. Once we do get back to work on site, Lisa’s spec book and detailed drawings will allow the crew and contractors to move a lot faster.

Cabinets

Matt is now a cabinet maker! He’d allocated a chunk of his time over the winter and spring to work on our project. Since we can’t work on the actual house, we figured we could get a jump on interior finishes by making all of the mill work for our half. Working off Lisa’s drawings, Matt’s making the cabinet boxes out of plywood and will finish the drawer/door fronts and cabinet ends with processed fir from our old house. I think it will look beautiful. Here are some images of the process:

plywood cabinet boxes
Matt’s garage workshop at our interim rental house
true 2×4 from our old house
Matt runs the 2x4s through the table saw to cut them down to 1″ thickness and expose the straight grain, and then glues them together to make a 12″ wide panel
He then runs the panel through the surface planer to a 3/4″ thickness
Here he has glued two 12″ panels together to create a wider panel
sample of a completed (unfinished) panel
panels for side of lower cabinets and fridge cabinet

Filed Under: Construction, Design, Featured Tagged With: cabinet construction, Passive House construction

The Quest for Simplicity

September 29, 2018 by clove Leave a Comment

As our beloved hole continues to take shape, the more technical among our readers may be wondering how things are looking on the Passive House modeling side.

As currently modeled in the Passive House Planning Package (PHPP), we are just squeaking by on the certification requirements. We had a Design Stage Review done by our certifier, Brittany, around the time we submitted for our Building Permit in the spring. The Design Stage Review is meant to be done before we start digging a big hole; and ideally, to give us some assurance that if things go according to plan, we are likely to achieve certification. Or, conversely, we would know early enough if any bigger changes were required. The review left me feeling confident in our design but with a long list of comments to respond to. Many of these comments involved refining conservative placeholder values for things like thermal bridging.

If I’m perfectly frank, I’d rather have a tooth pulled than spend a whole Saturday on PHPP updates. But there’s also the fact that things are still in flux, and while I want to know the energy impact of design changes, I am resistant to the notion that PHPP is our ultimate decision maker. There are design questions that absolutely impact the passive house model (and its predicted energy use), but are also influenced by other factors like practicality, cost, and aesthetics. PHPP doesn’t care about any of these things.

One thing that the model and I both care a lot about is simplicity. My strong inclination is to remove design complications, which by extension, tend to also remove modeling complications.

Here are the design questions we have been working through over the last while. We’re tackling each in the priority that Interactive needs answers to keep the project on schedule. I will tweak values in PHPP to test the impact, but will officially update them when we are satisfied that we have made good choices based on all of our criteria. With a bit of synergistic karma, our quest for simplicity will also lead to a certifiable passive house.

Roof Shape: Since we have to rebuild it anyway, we’ve chosen to do away with the hip roof on the ‘existing’ half. It’s a dramatic aesthetic improvement in my opinion but also a major simplification.

new gable roof (with the same floor plan)

old hip roof

Modeling the original hip roof was a less than satisfying experience. I could not completely capture the intersection of multiple hip roof slopes with the low slope roof of the new half using simple geometry and the dimensions provided on the drawings. And Interactive would have to build this! A gable roof is so much simpler to model and build.

The downside of this change is that the City needs to approve it. We are told it will only take a few weeks, but we have to submit a modified Development Permit package for the planning department’s review AND a revised Building Permit Package for the code inspection side. Good times.

Windows and Doors: We’re confirming final details of our Cascadia Universal Series fiberglass window and door order, which includes committing to the Solar Heat Gain Coefficient (SHGC) for the glazing. This is the value that determines how much heat is allowed through the windows versus reflected away. Higher is better in the model because it allows in more ‘free heat’, but lower is better to prevent overheating, and I think lower is ultimately the better way to go given our climate trends. I’m leaning toward using the lower value (Cardinal 360/180) on the south and west windows and the higher (Cardinal 270/180) on the north and east.

Much more fun than picking a SHGC for glazing is picking custom colours for our front entry doors. Thanks to our kindergartener’s astute design sense, there will be a purple door!

Ventilation: Each half of the duplex will have distinct heat recovery ventilation systems. We had been mulling over whether to pay for the more expensive Paul Novus units that have better heat recovery than the Zehnder units. This makes a difference of about 1 kWh/m2 heating demand, which is not insignificant when the maximum allowable is 15. I’ve got the less efficient Zehnder units in the model now, but this dilemma is likely to resolve itself even more favorably when the new Zehnder Q-series units become available in early 2019. They have vastly improved efficiency at much lower cost than the Paul units. Whoopee.

Heating and Domestic Hot Water Heating:  We have chosen to go with Sanden CO2 heat pumps for domestic hot water heating and in-slab radiant hydronic heating on the ground floors. These are air-to-water heat pumps that use CO2 as the heat transfer medium instead of something like R410-A. This technology has so much potential because most other refrigerants have several hundred to several thousand times the global warming potential of CO2. And the thing that doesn’t get talked about (and as far as I can tell has not been studied) is that typical refrigerant-based systems leak refrigerant like crazy. Anecdotal evidence suggests that 80% of the refrigerant that gets added to a system leaks out into the atmosphere.

The limitation of CO2-based systems is that they can only do heating, whereas other refrigerant based systems can provide both heating and cooling. We’re not currently planning to add mechanical cooling and we’re hoping that by the time the climate here becomes California, we’ll have sufficient shade trees to limit our exposure.

I’ve chatted with a few people who have experience with a Sanden “combi” system, including Peter J from Cascadia Architects. He has a functioning system in his Passive House home and shared a few tips for making sure it works properly without overheating the house – like heating the slab overnight and then shutting it off during the day and having a couple of supplemental heat sources for the few very cold days.

And further to the simplicity theme: by using polished concrete floors on the ground floors, we can embed the hydronic tubing; do one concrete pour and save on other floor finishes. It also makes for a clean modern look that we quite like.

And a Bunch of Little Things: I’m keeping a running markup of all the little things that occur to us the more we stare at the drawings – like moving a toilet location; combining the laundry and mechanical rooms to remove a wall and a door; shifting a window so there is room for a single bed along one wall. So basically thinking carefully about what it will be like to live in the space and making sure it works.

We’re quickly approaching the point where we’ve firmed up the bigger system choices. I will then do another update of PHPP, after which we’ll have a very good idea how the numbers will work out. Our decision-making will then shift toward things like kitchen cabinets and countertops and away from things with an appreciable impact on energy demand.

Filed Under: Design, Featured, Performance Tagged With: passive house, Passive House construction, Passive House performance, Passive House systems, ultra low energy

Portland Row House Tour

August 11, 2017 by clove Leave a Comment

We were in Portland, OR last week, amidst the haze of wildfires and 39 degree C heat, where I snapped a few photos of some interesting row house and small multi-family projects. Most of these buildings are in the Vancouver/Williams Street corridor in northeast Portland. I love the palpable creativity of this city, and find that the mix of old and new adds richness to the city’s character and history.

Older walk-up apartment


Newer interpretations of the row house


Newer interpretations of the row house


Old meets new


ekoLiving‘s sweet Couve rental apartment building


Interesting example of an interior facing row house


Love these guys


And hello, what’s this?


It’s the 3-unit North House by William Kaven Architecture. I love this too.


Filed Under: Design, Featured Tagged With: infill, row house

Argh, Parking! (Responding to City Comments Part 1)

February 17, 2017 by clove Leave a Comment

Lest you surmise I’ve been idly twiddling my thumbs for the past 3 months, I’m overdue to lift my head and share an update.

Besides shivering through Victoria’s longest cold snap in over 30 years, we’ve been working on 2 big things:

  1. Responding to the first round of city comments on our rezoning application.
  2. Completing the Passive House PHPP model.

I’ll cover the first item here. See this post for the Passive House model update.

We received our first round of comments back from the city on December 22 –  four weeks after we’d officially submitted. When I first reviewed the comments, I felt discouraged, as there appeared to be a long list of issues. But Ian, our planning consultant, pointed out this key sentence at the beginning of the letter:

The application as submitted can be considered with the land use policies relevant to the property.

Ian thought this was an excellent response. It is saying, albeit obliquely, that the city is likely to support our application, provided we address their comments. Great!

Ian and I met with the planner responsible for our project to clarify some of the comments. Nothing earth shattering resulted from this meeting, but it was good to have the face time and confirm that we understood their intent.

There were two major comments that affect our design: parking and roof lines.

Parking:

I long for the day when the level of consideration, money and space we devote to places to put our cars do not vastly overshadow the resources we devote toward places for people to actually live. Alas.

The rules around parking are largely inflexible and at odds with our desire to preserve green space on our urban lot. At the same time, the more we push the rules, the longer the timeline drags out and the less certain our outcome becomes, so we’re working toward a reasonable solution that satisfies city engineering but does not compromise our project goals.

We’re required to provide 2 off street parking spots for a duplex (the secondary suite does not require a third spot thankfully). Our neighbourhood has a precedent to allow for front yard parking, which we are invoking to preserve as much back yard space as possible.

One of the unbendable requirements is a 1.0 m setback from the rear of the parking spot to the property line. In the initial review, the engineering department also asked for an additional 1.4 m right of way in the front yard. Why? Because they might one day widen our entire block from the current 15 m street width to the more standard 18 m. Really? We already have sidewalks on both sides, parking on both sides, and boulevard green space between the sidewalks and street. The narrowness of our street also has the desired effect of slowing vehicle speeds. Sounds OK to me.

We do not agree with this request, nor is there any policy requirement that we grant this request. So we’ve decided to provide 1.4 m total, not 1.4 plus 1.0 m, as a compromise that we feel is likely to be accepted. Here’s how the design has evolved as a result:

Before: We were just a hair short of the 1.0 m required between the end of the stall and the property line, but thought we’d give it a shot:

After: We’ve shifted the house back 0.7 m and shortened up the back end of the new addition to achieve the 1.4 m setback at the front without infringing on rear setback limits:

This design change has the added bonus of simplifying the enclosure shape, which is good for Passive House, and we’re pleased with this evolution.

Roof Transition:

The City questioned the transition between old and new roofs. Something wasn’t working, and they rightly pointed out a weakness in our design, if not a simple lack of clarity.

We bandied about the idea of a more dramatic change to the existing hip roof to a gable roof. In addition to being a bolder shape, a gable roof would open up the potential for a loft space, vaulted ceilings and other cool design elements.

But then we thought through the implications – changing most of the roof line, extending the walls up to create the gable; interior redesign to include a stair or other access to the loft space, and potential zoning floor area restrictions we might now bump up against. Besides the fact that our existing house would no longer resemble its original self, there were a whole host of ripple effects that were going to add cost and stretch out the project timeline.

Fortunately, though, as the creative process often goes, this exercise led Mark A to a more elegant solution for the hip roof, which is what we chose to stick with. Here is the before transition from old to new:

And the after:

Renderings by Mark Ashby Architecture

We’ve been working on these revisions for the past six weeks. When complete, we will submit an updated set, a revised letter to Mayor and Council, and an updated narrative. We may get another round of comments, or if all goes well, we will move on to the meeting of the Committee of the Whole – one step closer to rezoning approval, and we’re holding firm on our current goal to be under construction this summer!

Filed Under: Design, Featured, Rezoning Tagged With: energy efficient design, infill, rezoning, ultra low energy

Duplex Design

October 24, 2016 by clove Leave a Comment

Here is the design that we presented at the community meeting last Thursday. We’re pretty excited by what Mark A and Kate have come up with.

The renovation of the existing house respects and maintains the original form and roof line, while the addition is intentionally contemporary, simple and contrasting. This design strategy highlights the relationship between old and new.

We are using traditional materials, including cedar siding and stucco, that are common throughout the neighbourhood. Deep window reveals introduced by the thicker Passive House walls add visual interest and depth to the facade. The landscaping ties everything together.


Front elevation, sketch by Kate Stefiuk

Front elevation, sketches by Kate Stefiuk


Front yard view, sketch Kate Stefiuk

Front yard, side view


Side yard from the south

Side yard from our south neighbour’s back yard

Back yard with sunken workshop

Back yard with sunken workshop


Landscape plan by Kate Stefiuk

Landscape plan by Kate Stefiuk


Lower floor plans, by Mark Ashby Architecture

Lower floor plan, by Mark Ashby Architecture


Upper floor plans

Upper floor plan


Streetscape, by Mark Ashby Architecture

Streetscape, by Mark Ashby Architecture


Filed Under: Design, Featured Tagged With: design, duplex, energy efficient design, low energy design, net zero, ultra low energy

Attached Duplex Design is a Go!

July 17, 2016 by clove 2 Comments

Attached model experiments by Mark Ashby

Attached model experiments by Mark Ashby

We’re going ahead with a new attached duplex design! Here’s why:

  • The attached option addresses some neighbours’ concern that the small lot house would have been too close to our neighbours. The attached option creates more space on the sides and fits better on our lot.
  • The attached option provides more distance to the large Garry oak in the adjacent yard to the south – better for its roots and less shade for our rooftop solar photovoltaics.
  • I’ve identified at least a couple of lending options that are viable for the attached option.
  • The massing is better for energy performance (less exterior walls = less energy lost through the envelope).
  • The approval process is simpler – we can meet the two-family zoning regulations with fewer variances and no longer need to collect petition signatures.
  • The city fees for the rezoning application are lower and we eliminate city subdivision fees (which amounts to savings of $5,000-$8000).

If we were set on the small lot subdivision option and were willing to wait a while, we might have been able to get it through. But the attached option does meet our needs and we do want to get the project going, so it felt like the best solution given the circumstances.

The design in now in progress and we’ll share renderings soon. One of the debates we’ve had is how to design an addition to an old existing house. Do we blend the design so that it looks like one unified whole? I think if we were designing from scratch we would do that. But to make the structure look like a unified whole, we actually would have to change the form of the existing house dramatically – particularly the roof.

We believe that the best way to honour the existing home and to retain as much of its existing structure as possible is to create a marked distinction between new and old. Mark A is taking a sculptural approach to the addition to contrast with the existing form and work with the existing roofline. Not an easy task, and we’re thankful we have an architect like Mark working out the details.

I had hoped to present the design at the mid-August Fairfield Gonzales Community Association Land Use Committee (CALUC), but discovered that the committee has been disbanded. Well, temporarily at least, as the group reconciles its status as a charity organization with its role in land use development issues. I am attending a community meeting to learn more. Stay tuned and in the meantime, enjoy the sun!


Filed Under: Design, Featured, Rezoning Tagged With: design, energy efficient design, rezoning, ultra low energy

Small Lot Design

May 23, 2016 by clove Leave a Comment

Here are some renderings and plans from the small lot design we have been sharing with our neighbours for the last few months.

I also presented this design at a preliminary meeting with the Fairfield Gonzales Community Association Land Use Committee (CALUC) in February. This was not the ‘official’ CALUC meeting, but rather a preliminary meeting that some neighbourhood committees request – an opportunity to introduce the project, meet the committee and hear their initial comments. We will apply to present at the “official” CALUC meeting when we are ready to submit the rezoning application, and we’re not there yet.

All renderings and plans are by Mark Ashby Architecture, unless otherwise noted.

Streetscape After Rendering

Streetscape AFTER

Streetscape Before Rendering

Streetscape BEFORE

View from the southeast, rendering Mark Ashby Architecture

View from the southeast

View from the northeast, rendering by Mark Ashby Architecture

View from the northeast

View from south neighbour's back yard, sketch by Kate Stefiuk

View from south neighbour’s back yard, sketch by Kate Stefiuk

East Elevation, rendering by Mark Ashby

East Elevation (front)

West Elevation (rear), rendering by Mark Ashby

West Elevation (rear

Site Plan, by Mark Ashby Architecture

Site Plan

Lower Floor Plans, by Mark Ashby Architecture

Lower Floor Plans

Upper Floor Plans

Upper Floor Plans

Filed Under: Design, Featured Tagged With: design progress, low energy design, small lot subdivision

Landscape Concept Design

February 12, 2016 by clove 1 Comment

street landscape

A walk down our block

The landscape is a defining quality of our eclectic neighbourhood, and one of the goals of our design is to add something good to that landscape.

Streetscape Before Rendering

Streetscape Before

Streetscape After Rendering

Streetscape After, rendering by Mark Ashby Architecture

Here are a few key ingredients of the landscape concept:

  • We want to feel a stronger connection to the outdoors and to extend our living space into the back yard. Mark A has redesigned the back of our existing house to strengthen that connection from the kitchen.
  • We want to grow food while playing outside. Kate S has packed a ton of beauty and functionality into a compact back yard space. Think veggie beds, espalier fruit trees, herb boxes, cedar benches, even a sand box for playing.

Landscape Concept Plan by Kate Stefiuk

Landscape Legend

Landscape Concept Plan by Kate Stefiuk

  • Deciduous trees can be natural allies for an ultra-low energy house. If placed well, they can shade windows from direct sun in the summer when you’re at risk of overheating, and then allow that direct sun in the winter when it helps warm the house. The tree in front of the new (south) house shown in the plan is an example, where it will shade the rising sun from the east facing windows in the summer.
  • We intend to manage storm water on-site. The City has an excellent guide in its DIY Rainwater Management Standards for incorporating storm water retention, management, and/or re-use strategies into the landscape design (with accompanying grants through its Rainwater Rewards program). We’re still working on which strategies will work on our site, and debating low tech solutions like rain gardens vs. higher tech solutions like using rainwater to flush toilets. I’m a big fan of simplicity and less a fan of systems that will require pumps and filters and continual maintenance. If anyone knows of a stylish but simple composting toilet, I’m all ears!

Filed Under: Design, Featured Tagged With: infill, landscape design, rain garden, small lot subdivision, storm water management

Design Charrette!

January 8, 2016 by clove 4 Comments

I hosted our design and build team at RDH for a design charrette in early December. I waited to hold this meeting until after we’d talked with enough neighbhours that we felt comfortable moving forward, and after we felt confident that we would be able to finance the project. We’d waste a lot of work and money on the detailed design if we didn’t have sufficient support on both fronts.

The goal of this meeting was to discuss big design choices in the context of cost, constructability, zoning, and performance, and then turn the design team loose to bring it to a point that we can present to the Community Association, and ultimately assemble our rezoning application package.

Around the table were Mark A (Architect), Mark B (Builder), Ian Scott (Planning Guru), Rob Lepage (RDH Building Science expert), and Kate Stefiuk (Landscape Designer). I felt awed and grateful that this talented and knowledgeable group of individuals was here to help make our project happen.

We hashed out most of the big design questions in three hours at the office. Mark A, Kate and I then fortified ourselves against the December rain with sushi and miso soup and wandered our property for another hour to discuss the landscape design in context. A productive day!

Here are the key items we discussed and agreed on (see the project page for the basic scope):

  • Building Shape
  • Suite vs. No Suite
  • Building Entries
  • Enclosure Design and Materials
  • Systems
  • Parking
  • Landscape and Storm Water Design
  • Accessory Buildings
  • Energy Modeling
  • Existing House Elements to Retain
  • Schedule

Building Shape:

The ideal passive house has 4 corners. Why? Well, you are investing more material into the envelope than a typical building to super insulate it. Every time you turn a corner, you have to transition all that material.  The cost of detailing is much higher than a straight wall, and the likelihood that the detailing will end up being less than perfect is high. This leads to increased thermal bridging and increased heat loss. So to build a high performing envelope in a cost effective manner, the less corners the better. The challenge then lies with the architect to dress up a box!

Fortunately we’re already starting with simple shapes. The existing house is a rectangle and we will maintain the existing footprint. The new house is very close to a rectangle, currently showing one wall bump to work around some setback challenges:

New house bump

and a tricky cut-out detail at the entry, which will add cost and compromise performance due to complicated detailing:

New house entry

The wall bump is ok because it is simply an extra corner. Mark B suggested redesigning the front entry, though.

Suite vs. No Suite:

The City planner I met with back in October believed that the suite was the thorniest element of our proposal, since it is not supported by existing small lot zoning. However, our neighbours were either neutral or in support of adding the suite. Our design team felt that we could make a late change it would make or break our project, so we’re sticking with the suite for now.

Building Entries:

Ian suggested we consider making the existing house main entry more like a traditional front porch. This suggestion was based on his experience with city design guidelines and the typical feedback these projects receive. I am deferring to Mark A on this one, as I believe that a design can be modern, welcoming from the street, and fit with the neighbhourhood fabric without having to mimic historic styles.

Downstairs bike entry: We need an easy entry into the downstairs for bike storage. This we know from years of hauling bikes in and out every day; up and down skinny stairwells, around tight corners and various other less-than-ideal arrangements. The easier it is, the more likely we will continue riding every day forever. We may also have some limited bike storage space in Matt’s detached workshop, but a storage space in the main house for at least the most used bikes is really the best arrangement for comfort and ease of access.

Enclosure Design & Materials:

  1. Foundations: We are assuming that we will rebuild the foundation of the existing house after it is lifted and we are thinking of using a similar approach for both houses – a slab on grade with traditional footings and insulation stuck between, like this (squiggly lines are insulation):Foundation Sketch - proposedThis approach will save cost compared to doing something like this, where we’d have to insulate under the footings:Foundation Option
  2. Blasting? Yes, hitting bedrock is a real possibility in our location. It actually makes me wonder if that is the reason the existing house is tucked off to the north side of the property. We will do some exploratory digging later on to get a better idea. Mark B suggested including a budget of $5,000-$10,000 just in case.
  3. Exterior Walls: We will take the existing house walls down to studs and apply a similar approach to both new and existing: taped plywood sheathing + weather resistive barrier like SIGA Majvest (which Mark B says is cost competitive and easier to work with than Tyvek) or other weather resistive barrier + rockwool + strapping + cladding, similar to this:

    Source: Guide for Designing Energy Efficient Building Enclosures

    Source: Guide for Designing Energy Efficient Building Enclosures

  4. Roof: Mark B advised sticking with interior attic insulation given the cost of exterior insulating the roof, even though I like the conceptual simplicity of exterior insulation. The detailing for transitioning the air barrier and insulation from the exterior to interior is straightforward. We need to poke our heads into the attic space of our existing house to better understand our existing condition.
  5. Windows: We are assuming triple pane. The material is to be determined, but we will aim to carry budget for high performing wood windows and we can always downgrade from there. Our preference would be for wood or fiberglass windows. We’d like to avoid products containing PVC, and I’ve heard mixed results about the long-term performance of reinforced vinyl products. If we do go for Passive House certification, our window options are more limited, since we have to select certified products. Mark B said that Optiwin windows from Germany have proven to be the most reliable and cost competitive certified products despite shipping from Europe. He suggested a budget of $60-70/sq.ft. for windows.

Systems:

We will install all-electric systems for both houses, using a high-efficiency heat recovery ventilator (HRV) for ventilation + solar PV + some form of electric supplementary heat, to be determined based on our modeled heating loads. I am also curious about the new Tesla house battery, although BC Hydro’s net-metering rate (the price at which they will buy energy from us) for site generated electricity is actually very good ($0.0999/kWh)*, and may make energy storage unnecessary at least in the near term.

*Our current Step 1 rate (for consumption up to 1376 kWh) is $0.0797/kWh and the Step 2 rate is $0.1195/kWh. If we can stay under the Step 1 threshold (entirely feasible in a low energy house), we can actually net a profit if we generate more than we consume.

Lighting will be all LED, both houses. Other systems, like domestic hot water and possibly grey water re-use are to be determined.

Parking:

Parking is always a hot topic that gets way more attention than it deserves. If we didn’t have so many cars, we wouldn’t have so much trouble finding places to put them and it just wouldn’t be such a big deal.

Alas, we’re not there yet – we are here. “Here” is a zoning requirement to provide one off-street parking spot per single family dwelling. The rental suite does not require an additional off-street spot, thankfully.

We started out with parking in the front because the lot width is tight. Then we moved it to the back with a shared driveway because I figured people walking by our house would not want to see cars parked in front.

Turns out that our neighbourhood has an entirely different approach to parking. The R1-G zoning that governs typical single family home developments has evolved to allow parking in the front; the idea being that having a couple of well-placed permeable parking strips in the front of the house means that parking is provided off the street while consuming the least amount of green space. Providing parking in the rear means a long driveway, turnaround space, and cars idling in the back yard.

Here’s a snapshot from the parking guidelines, along with a few photos of front yard parking in the neighbourhood:R1G front yard parking

IMG_6206_2

Neighbourhood example of front of house parking

IMG_6208_2

An example with creative application of permeable pavers

Neighbhourhood example of front yard parking area. This one has a patio that appears to straddle the property line with its neighbour. A nice human-scale touch.

This one has a patio that straddles the property line with its neighbour; a nice human-scale touch


Our neighbor several doors down on Clare St enlightened me of this approach and it makes a lot of sense. The back yards that share a fence between Clare and Chamberlain Streets are all green space. There is not a single car parked behind a house. The effect is of a large park space as far as birds are concerned. Many of the yards even have gates between them, encouraging outdoor exploration and connection for humans too.

So we’re back to the front yard. The compromise is that we will be proposing two driveways in order to break up the parking for the two houses, whereas with the shared drive aisle to the back yard, we had only one driveway. But I think on balance this is a better approach.

Landscape + Storm Water Design:

Mark A, Kate, Matt and I discussed the landscape design onsite after our charrette. Being onsite allowed us consider the design within the context of neighbouring properties and sight lines.

This is what we want the landscape design to do:

  • Encourage/facilitate connection with outdoors
  • Enhance privacy between connecting properties at the rear of the houses, particularly with respect to window sight lines
  • Include playful natural features for kids (small hills etc)
  • Include rain gardens to slow storm water flow
  • Create a back yard oasis
  • Include a tree retention + tree management plan – this is required for the rezoning package. We will also ask the arborist to advise on the large gary oak tree next door, whose branches and drip line overlap the proposed new house.
  • Use permeable driving strip/parking pads

Accessory buildings:

Matt’s workshop behind the existing house will be~12×18, with single phase power and decent insulation, but less than the main house.

For the new house, we will plan for an accessory building for additional storage given compact floor plan. It does not need power, but could provide electrical conduit for future. Insulation will be the same as Matt’s workshop.

Energy modeling:

I will do the energy model for the existing house; Mark A will do the new house. If we do seek Passive House certification, we can each obtain our “Certified Passive House Designer” designation having been the prime modeler and Passive House designer for one of the houses.

Existing house elements to retain to the extent possible:

  • Hardwood floors
  • Most exterior and interior framing
  • Solid wood doors
  • (Wonderfully long) clawfoot tub (add separate shower)
  • Farmhouse sink (kitchen)
  • Several interior walls (remove lathe + plaster)

Schedule:

We’re aiming to get the rezoning application submitted in February 2016, which is tight given that we have to present to the community association and collect signatures before that. If we can get it in by February, though, it is conceivable that we will have a building permit by the summer. Mark B advised that if he can start construction by early August at the latest, he can get the roof up before the rainy season (which for us is October-December). If we don’t get the permits by then, he advised waiting to start until the following January or February when the clouds lift again.

Sequencing of new and existing house construction: Ideally, we can complete both projects concurrently. It will be more efficient to pour the foundations at the same time, for example, since the main cost is getting the equipment on site. However, the sequencing will also depend on how our financing comes together and whether we need to move the existing house to register the new subdivision. If it costs us more to finance the project doing it all at once than we save through construction efficiencies, it will make more sense to do the new build first and then finance the renovation from the sale of the new house.


Filed Under: Design, Featured Tagged With: design, enclosure, energy modeling, foundations, parking, performance, roof, schedule, systems, walls

  • 1
  • 2
  • Next Page »

Who is Stretch Developer?

Stretch Developer is written by Christy Love. In partnership with my husband Matt, we are challenging ourselves to create the kind of homes we want to live in and see more of in our community. Home is the incredible Victoria, BC, Canada.

Sign up!

Sign up to receive email notifications of new posts.

Recent Posts

  • New Uses for Old Wood Part 2 September 26, 2021
  • Ongoing Preparations for the Apocalypse August 13, 2021
  • Things We’ve Noticed – Energy Edition May 29, 2021
  • Passive House Suite for Rent April 17, 2021
  • Things We’ve Noticed – Comfort Edition March 14, 2021

Blogs We Like

Green Building Advisor Blogs

Musings of an Energy Nerd

Treehugger

Talk to ARYZE

Recent Posts

  • New Uses for Old Wood Part 2
  • Ongoing Preparations for the Apocalypse
  • Things We’ve Noticed – Energy Edition
  • Passive House Suite for Rent
  • Things We’ve Noticed – Comfort Edition
  • New Uses for Old Wood Part 1

Tags

budget building permit cabinet construction climate action climate change community engagement construction deep energy retrofit design design progress development permit duplex duplex + suite energy consumption energy efficient design financing financing passive house finding land food security home inspections infill low energy design neighbourhood engagement net zero passive house Passive House comfort Passive House construction Passive House construction costs passive house for sale Passive House performance Passive House performance; Sanden CO2 heat pump Passive House rental Passive House systems passive house testing performance pro forma property search tips reclaimed wood reclaimed wood construction rezoning roof row house small lot development small lot subdivision ultra low energy

Copyright © 2026 · Metro Pro Theme on Genesis Framework · WordPress · Log in


Loading Comments...