Stretch Developer

Taking urban development into our own hands

  • Home
  • About
  • The Project
    • Finding a Property
    • Design
    • Approvals
    • Financing
    • Construction
    • Performance
  • Blog
  • Contact
  • Rental Suite

Things We’ve Noticed – Energy Edition

May 29, 2021 by clove Leave a Comment

Over the past couple of months, I’ve been tying up loose ends on our project. In addition to upping my accounting skills by sorting out the GST and capital gains tax owing for the sale of the other half, I (finally) finished up our Passive House certification documentation, which was tedious if not difficult. As I await what will most surely be a request for more documentation from the certifier, I thought I’d have a look at how our actual energy consumption compares to both the modeled consumption and our project goals.

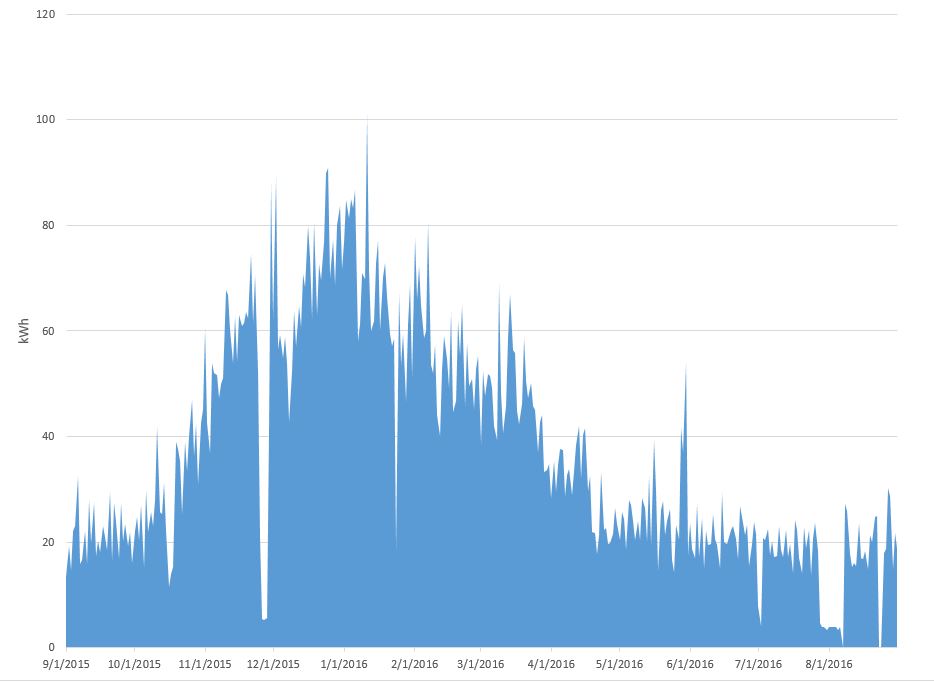
Here’s our latest 12 months of BC Hydro electricity bills (May 2020 to April 2021, for our “half” of the duplex, which includes our place and the small rental suite):

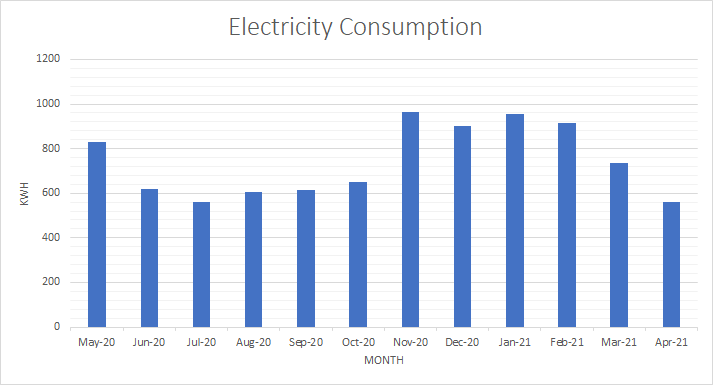
As a crude estimate of heating energy, we can take the lowest monthly consumption (in this case, last July or this April, at about 560 kWh) and assume that is the base – or non-heating – consumption for each month, and everything above that is for heating.

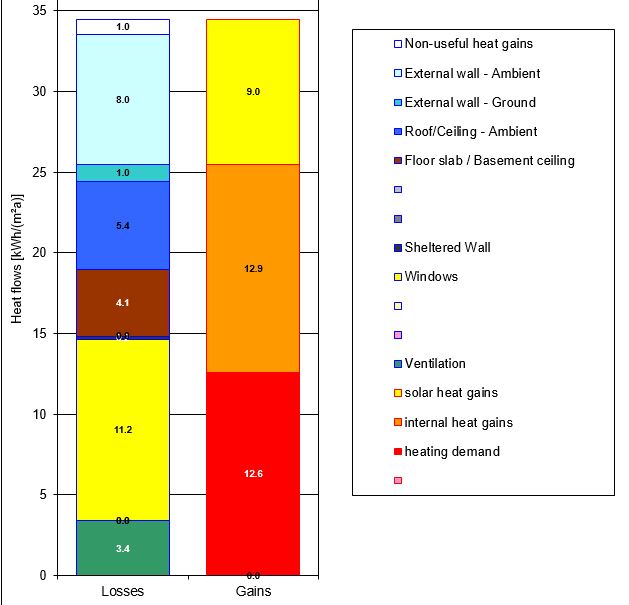
Here’s how this compares to the per unit area consumption in the model:

MeasuredModeled in PHPP
Annual total site energy, kWh/m24731.9
Annual total heating energy, kWh/m212.814.5

So we’re at 12% below the predicted heating energy consumption, but 47% higher than the predicted total site energy. I have a few thoughts on this:

  • The Passive House model notoriously underestimates base load consumption, partly because the system was developed by Germans who use less energy than North Americans. Not that aspiring to be more like our German friends by taking two minute showers and turning off the water while shampooing isn’t worthwhile, but even 47 kWh/m2 per year is very low when you consider that the North American average is more like 220. Even the German average is over 100.
  • May 2020 looks anomalous. My notes tell me that last spring we had the upstairs in-floor heating in the bathroom set a bit too high (it is an electric resistance mat under the tiles).
  • We also had a tenant in the suite through August who controlled his own electric resistance wall heater and tended to prefer relatively warm temperatures. I also note that we have not had a tenant in the suite since September, so these two considerations might cancel each other out, but we’re likely to see some continued variation as we rent out the suite.
  • The model does not include electricity consumed in Matt’s workshop – another reason why some sub-metering would be useful.
  • Working From Home and a bit of Schooling From Home. That would be me, for most of the last year, Matt for half the year, and our daughter for a few months. More lights on throughout the day, plus one or two computers and various power tools in use likely bumped up our total.

Even given these variations from the model, I think these results are amazing. They show that our enclosure first approach has achieved its intent, i.e. to dramatically decrease the heating demand of our home. I also feel very confident about our choices to invest in a very high performing heat recovery ventilator and to spend a bit more for a very efficient CO2 heat pump hot water heater.

Now let’s have a look back to our original project goals as they relate to energy:

  • To follow passive design principles with the potential for net zero energy consumption and zero operating carbon emissions
  • To build three units of housing that consume less energy than the original single family house

Given that BC’s electricity grid is mostly clean, we are allowed to claim zero operating carbon by virtue of being all-electric. In truth, there are still carbon emissions associated with electricity generation in the province – most significantly when we import from carbon intensive sources – but it’s still dramatically lower than using natural gas or other combustion fuels on-site.

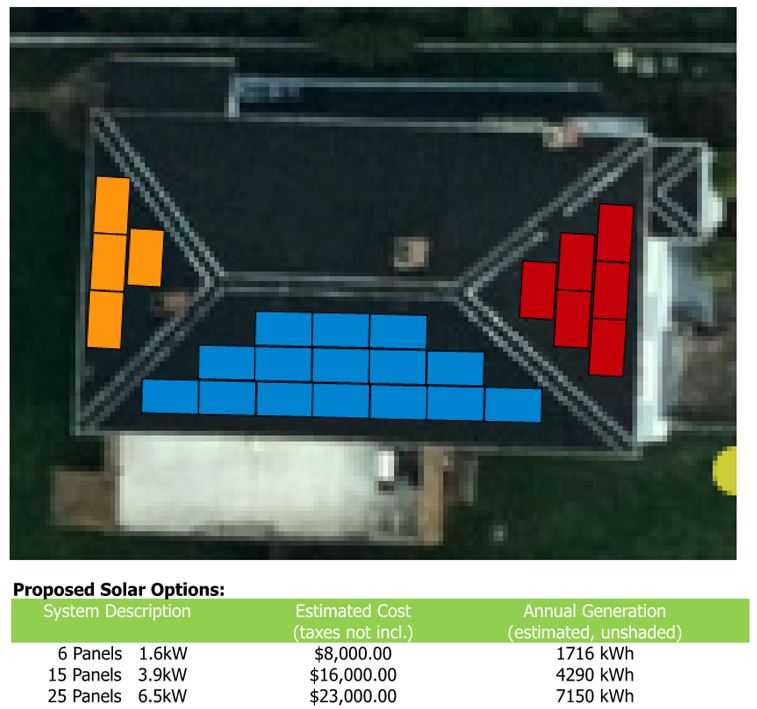
Regarding the original house’s energy consumption, recall that our pre-project consumption was ~123 kWh/m2, which is 2.6 times higher than where we’re at now on a per unit area basis. And that was in a home that was unacceptably heated to anything close to today’s comfort standards. Our new neighbours have only been in the other half of the duplex since October and we’ll have to wait until they’ve been in for at least a year to get a total for the whole site. Beyond this, we will be looking to add solar PV and see how close we can get to net zero energy consumption.

Was there a sense of sacrifice to achieve this level of energy consumption? That’s the beauty of building like this. We have way less energy consumption and better comfort and air quality. Yes, I do enjoy finding ways to reduce waste of all kinds. Yes, I did decide that having very warm feet when walking into the upstairs bathroom was not worth the electricity cost and dialed that thermostat back. But, to the horror of my German friends and the water starved nations of the world, I still take long hot showers. What can I say? It’s where I do my best thinking and it’s a tough habit to break. All in all, we feel pretty spoiled.

Filed Under: Featured, Performance Tagged With: Passive House performance

Things We’ve Noticed – Comfort Edition

March 14, 2021 by clove Leave a Comment

We’ve now been living in our Passive House for about 16 months, although we were still installing and commissioning things early on. We’ve now had a full summer and most of a winter to experience the space and play around with how we run it. Here are a few things we’ve noticed so far specific to summer and winter comfort.

In the summer:

The Passive House software allows a modelled design to have no more than 10% of all indoor hours above 25 C. If you crammed all that time together, it would be over a month of living in a space that’s warmer than that. Our model predicted 2% of hours above 25 (assuming no “free” cooling by opening windows in the evening). Through our first summer, I only saw the interior temperature peak above 25 a handful of times and while not sweltering, I don’t think I would have been ok with a month straight being that warm.

Having said that, we don’t have mechanical cooling, nor do I think we need it. Instead, there are things we have been doing – or will do this summer – to make best use of our dirurnal climate through natural ventilation and to limit the amount of heat coming in.

I played around with our heat recovery ventilator’s boost and bypass modes during the warmest days last summer. Both functions can provide a cooling effect. Boost mode simply increases the airflow. Bypass mode bypasses the heat exchanger, which is useful when the outdoor temperature dips in the evening while it’s still warmer inside. During these times, I often switched the HRV to both boost and bypass to deliver the maximum amount of cooler outdoor air.

Our boost mode airflow changes the entire volume of the house 1.2 times every hour. Given this, I had expected that when the outdoor temperature dipped overnight in our coastal climate, it would have cooled the house quite quickly. This was not our initial experience. A few things I think are moderating this impact:

  • Our Zehnder Q600 was still doing some heat exchange even when in “100% bypass” mode. I’m guessing this is a limitation of the heat exchanger design.
  • Our HRV has seen a lot of construction dust since we installed it. A dirty filter can reduce airflow by 15-20% and when I recently changed a quite dirty filter, our airflow on normal popped up from 157 CFM on “normal” mode to 184 (and from 232 to 265 on boost mode). Something to pay more attention to this summer.
  • I also expect there are other internal gains that may be taking longer to cool on those very warm days. Our downstairs floor slab does get direct solar gain during sunny summer afternoons which likely continues to radiate throughout the evening.

What worked way faster and better was cranking open one east facing and one west facing upstairs window after the temperature dipped in the evening, which created a lovely cross breeze that cooled things down very quickly. On the list for this summer is to get screens installed on those high impact windows so that we can leave them open longer as needed without the wasps and moths also getting in. Sometimes just the sensation of moving air makes all the difference in our perception of comfort. I could see a simple circulating fan being quite useful in houses that don’t have as effective window placement for cross ventilation.

We also spent our first summer with no window coverings and minimal exterior shading. While interior shades are not great for preventing overheating in homes with poorly insulated windows and high solar heat gain, I do expect they will mitigate the late afternoon direct solar gain through our large west facing window. I will be testing this theory this summer, now that we have shades like civilized people. And we remain open to the possibility of adding exterior shading in the future. So lots of “plan b” options – at least in today’s climate – before we would even consider mechanical cooling.

In the winter:

Our main heat source is the Sanden CO2 air-to-water heat pump supplying infloor hydronic heat through our downstairs slab. This works really well, and feels nice on the feet too. We kept the system very simple and did not install any hydronic zones upstairs.

Similar to my comment about summer air distribution, I found that the HRV did not spread the heat from downstairs around the house as much as I’d expected. We do most of our living upstairs and I found as much as a ~2C difference between the upstairs and downstairs temperatures on the coldest days.

We do have electric resistance radiant heat in our upstairs bathroom floor but I’ve been avoiding turning it up too high given the electricity cost. It could make up the difference, but I’d prefer that our heat pump do most of the work given that it’s 2-4 times as efficient as electric resistance. I also noticed – now that we’re getting some early spring sunshine- that direct solar gain through that big west window adds an extra degree upstairs on sunny afternoons. I’ve been idly pondering future options for those cold days without sun, which may include adding a hydronic radiant panel upstairs (fed by the heat pump), or possibly putting a small hydronic coil in the supply air duct.

For now, though, pulling on a sweater is good enough, and I can’t complain about that. My old fleece housecoat, which I would often wear over my clothes in my pre-Passive House days, has hung unused in the closet and is probably due for the donation bin. Thank you, old housecoat, for your years of faithful service, but I just don’t need you anymore.

Filed Under: Featured, Performance Tagged With: Passive House comfort, Passive House performance

Yes, the water is hot!

August 23, 2020 by clove Leave a Comment

Some of you may be curious how our Sanden CO2 combi heat pump system is working out.

The Sanden unit is an air-to-water heat pump that pulls energy from outdoor air to heat water. We’re using it to heat both the water supplying our radiant slab (to keep the place warm in winter) and to heat the water at our faucets. Hence the “combi” system.

Here’s a basic run-down of its major parts and what they do.

Cold water is run directly to the outdoor unit:

which uses CO2 to pull heat out of the air in a reverse refrigeration cycle and then heat the water. The warmed water is then fed into the insulated storage tank in the mechanical room:

If there’s a call for hot water from our laundry, a faucet, or the shower, the water from the tank directly supplies those fixtures.

If there’s a call for heat from the radiant slab (as determined by a thermostat), this little green machine kicks into gear:

This is a “Taco X-Pump Block”, a box containing two small pumps, a heat exchanger, and controls that enable ‘plug-and-play’ combi systems. When there’s a call for heat from the thermostat, the circulator pump moves hot water between the tank and the X-Block’s heat exchanger, while the other pump circulates the water through the hydronic system, also passing by the heat exchanger. This allows heat transfer to the closed loop hydronic system without mixing with the domestic hot water.

So how’s it working?

One of the reasons that CO2 works so well as a heat transfer medium for a domestic hot water system is that it loves a high “lift” – in other words, it can turn really cold water into really hot water. Amazingly, this heat pump can pull heat from air as cold as -15 F (-26 C brrr) and, according to its specification, it can heat water up to 175 F (79 C) (although I expect it would need warmer than -15 F air to get the water that hot). AND – it can do this extremely efficiently, producing up to 4.5 times as much energy as it takes to run the equipment. Compare that to, say, a natural gas boiler, which always produces less useful energy than it consumes.

We’ll have to do some more detailed monitoring to test the efficiency claims, but I can report on whether it’s keeping up with our hot water demands. The short answer is: with ease. Our 119 gallon tank (the biggest option) is serving both our home and our small rental suite and we have yet to run out of hot water.

The trick with a combi system is sharing the load between heating and domestic hot water demands. The big question (at least in my mind) is how to most efficiently provide hot water when we want it for a shower, while also providing sufficient heat to the radiant slab when it needs it.

175 F is pretty darned hot – WAY hotter than we’d ever want the water coming out of our taps. In our fiddling with the system controls, we adjusted the supply temperature as high as 160 F and we’ve since dialed it back to a more standard 140 F, which is plenty hot enough for the nearly-scorching shower lovers out there.

The reason we initially dialed up the supply temperature was to see if we could meet a call for heat from the slab and, at the same time, get really hot water at the faucets. It did seem this was possible in a highly insulated home like ours, based on our limited late winter testing, but it’s not a very efficient (or necessary) way to run the system. We would be heating and maintaining a tank full of water way hotter than we need it to be most of the time.

A couple of friends nearby have similar systems in their passive houses. They’re both using programmable thermostats to top up the heat in the slab overnight when there is no demand for domestic hot water, and then just let it coast during the day. This strategy makes great use of the thermal storage effect of the concrete slab. It takes a while for a slab to lose its heat, so once it’s up to temperature, it will stay there and take very little input to keep it there – especially in a Passive House. I could demonstrate this by doing some math, but, well, it’s a summer weekend and I just don’t feel like it.

I’m confident that the system will tick along nicely this winter using a programmable thermostat to prioritize slab heating overnight and domestic hot water use during the day, while keeping the supply temperature at 140 F. Stay tuned when the temperatures start to dip again and we get to see it all in action. I might even pull out some equations.

Filed Under: Featured, Performance Tagged With: Passive House performance; Sanden CO2 heat pump

Airtightness Test Results

June 27, 2020 by clove Leave a Comment

I sometimes hear people say, as a criticism of very airtight homes, that a house has to “breathe”. Well, I agree completely – and our airtight home does breathe. I would just rather pass the air through a set of building lungs with filters that actually clean the air. In an old house that “breathes”, the air could very well be sucked in through walls full of asbestos and rat poop. It’s completely uncontrolled. And a leaky home also means heat pouring out (or in) when you’d prefer it didn’t.

Of course we can open the windows at will. But if we don’t, we have 100% filtered outdoor air being continuously supplied to our bedrooms and living spaces, and exhausted from the bathrooms and kitchen. We can turn it up or down if we want, but most of the time we set and forget – especially easy to do when the system is inaudible.

On top of the benefits of good ventilation, the heat recovery ventilator captures the heat from the exhaust air to preheat the incoming air, which is a key ingredient to getting the heating demand and cost so low.

Now that we agree that airtightness and ‘breathing’ are not mutually exclusive concepts, and that airtightness is a good thing, let’s talk numbers.

A certified Passive House must reach an airtightness of 0.6 Air Changes per Hour, tested at 60 pascals of induced pressure. A typical new home being built today is around 2.5 ACH (although this is starting to trend down in BC now that we have Energy Step Code requirements to test for airtightness). Older homes can be upwards of 10 ACH. Considered another way, this means that, under 60Pa test conditions, ten times the entire air volume of an old home leaks out of uncontrolled openings in the span of an hour. Well that’s a bit of a waste isn’t it.

So how did we do?

We did a mid-construction test way back in 2019, when the air barrier was still exposed and all the holes for the cladding attachments had been made:

The grey peel and stick membrane visible here serves as both the air barrier and the water resistive barrier.

This test is a useful exercise, although not required, to catch any big holes or systemic issues while the air barrier is still exposed and reparable.

Reed from Adapt Energy Advisors setting up the fan door for the mid-construction test.

In the mid-construction test, we hit 0.27 ACH. Woot! And actually not all that surprising. We have seen many new buildings that use a peel and stick membrane achieve a high degree of airtightness. This was an average of the pressurization (blowing air into the house) and depressurization (sucking air out) tests and the two individual tests were comparable.

Skip to the final test, which is the one that matters for Passive House certification. We did this one when the building was essentially done at the end of May 2020.

This time we tested to 0.27 ACH under pressurization and 0.39 under depressurization, for an average of 0.33. Still well below the threshold of 0.6 although I was puzzled that the final test was less airtight than the mid-construction test, and that the building was more leaky under depressurization than pressurization.

Given our enclosure approach, I would have expected an improvement if any change. We’d corrected at least one source of leakage since the mid-construction test. When we replaced the locking hardware on our entry doors (they had to be re-keyed to match the suites) we discovered that the lock hardware had not been fully caulked.

On the old locks, those two holes were only partially caulked. Matt ensured the new ones had a good seal

In a very airtight home these small things make a difference. During a few very cold days in January, our HRV went into unbalanced mode to prevent its core from freezing and we could feel the cold air being sucked through the locking hardware.

The fact that the depressurization test was higher suggests that air was more easily sucked through a hole than pushed out of it. We’re thinking it might be this open drain from the pressure relief valve of the hot water tank. From what we understand, it connects to the perimeter drainage system outside the house.

This doesn’t feel like a big deal to me. I don’t think there is any air leakage happening through this pipe during normal operating pressure. And regardless of my desire to achieve the best possible result , 0.33 ACH is still extremely airtight. At levels this low, further efforts to chase leaks will not have any real effect on energy performance and are not really worth the time and effort. I have other things to keep me up at night!

Filed Under: Featured, Performance Tagged With: passive house testing

Things That Go Buzz in the Night

May 16, 2020 by clove Leave a Comment

People who live in Passive Houses say that when you virtually eliminate all outside noise through your well insulated and airtight enclosure, the noises inside become much more apparent. So what are the things that go bump or (more likely) buzz in the night in a Passive House?

When we’re not making noise ourselves, our fridge is by far the loudest thing in our home. Beyond purchasing an EnergyStar appliance that you know will run relatively efficiently, there’s not a lot to be done here, and the background hum of a fridge is not a concern in my books.

The ventilation system is extremely quiet. Very efficient heat recovery ventilators like the Zehnder Q series units we have are not only inherently more quiet than less efficient units, they are also tested to meet stringent sound performance requirements. In occupied spaces, it is inaudible except when we operate in boost mode and even then, we can only hear a slight whir if all else is silent and we train our ears to hear it.

The hydronic heating system is also very quiet. In the mechanical room we can hear the low hum of two small pumps moving water through the pipes when there is a call for heat.

So far so good. But what was that godforsaken buzzing sound? I only heard it on our side when in the mechanical room, but in the other unit, it was very apparent upon opening the front door- the kind of whiny buzz that could be used for sleep deprivation and other forms of subtle torture.

Further investigation identified the culprit, which was this innocent looking guy:

This is an ASCO RedHat general duty actuator for a solenoid valve that is part of the emergency drain down system (which protects the heat pump in the event of a power outage). It consumes about 10W and is continuously powered, which equals not only unwanted noise, but wasted energy.

Some back and forth with Len, our neighbourhood hydronic specialist, and a bit of googling turned up this RedHat electronically enhanced solenoid actuator, a next generation product that reportedly only consumes ~1 W and is specifically designed for applications where noise is an issue:

$400 in parts and a couple hours of Len’s time later, et viola, problem solved. I can now say with confidence that all is quiet on the Passive House front.

Filed Under: Featured, Performance Tagged With: Passive House performance

The Quest for Simplicity

September 29, 2018 by clove Leave a Comment

As our beloved hole continues to take shape, the more technical among our readers may be wondering how things are looking on the Passive House modeling side.

As currently modeled in the Passive House Planning Package (PHPP), we are just squeaking by on the certification requirements. We had a Design Stage Review done by our certifier, Brittany, around the time we submitted for our Building Permit in the spring. The Design Stage Review is meant to be done before we start digging a big hole; and ideally, to give us some assurance that if things go according to plan, we are likely to achieve certification. Or, conversely, we would know early enough if any bigger changes were required. The review left me feeling confident in our design but with a long list of comments to respond to. Many of these comments involved refining conservative placeholder values for things like thermal bridging.

If I’m perfectly frank, I’d rather have a tooth pulled than spend a whole Saturday on PHPP updates. But there’s also the fact that things are still in flux, and while I want to know the energy impact of design changes, I am resistant to the notion that PHPP is our ultimate decision maker. There are design questions that absolutely impact the passive house model (and its predicted energy use), but are also influenced by other factors like practicality, cost, and aesthetics. PHPP doesn’t care about any of these things.

One thing that the model and I both care a lot about is simplicity. My strong inclination is to remove design complications, which by extension, tend to also remove modeling complications.

Here are the design questions we have been working through over the last while. We’re tackling each in the priority that Interactive needs answers to keep the project on schedule. I will tweak values in PHPP to test the impact, but will officially update them when we are satisfied that we have made good choices based on all of our criteria. With a bit of synergistic karma, our quest for simplicity will also lead to a certifiable passive house.

Roof Shape: Since we have to rebuild it anyway, we’ve chosen to do away with the hip roof on the ‘existing’ half. It’s a dramatic aesthetic improvement in my opinion but also a major simplification.

new gable roof (with the same floor plan)

old hip roof

Modeling the original hip roof was a less than satisfying experience. I could not completely capture the intersection of multiple hip roof slopes with the low slope roof of the new half using simple geometry and the dimensions provided on the drawings. And Interactive would have to build this! A gable roof is so much simpler to model and build.

The downside of this change is that the City needs to approve it. We are told it will only take a few weeks, but we have to submit a modified Development Permit package for the planning department’s review AND a revised Building Permit Package for the code inspection side. Good times.

Windows and Doors: We’re confirming final details of our Cascadia Universal Series fiberglass window and door order, which includes committing to the Solar Heat Gain Coefficient (SHGC) for the glazing. This is the value that determines how much heat is allowed through the windows versus reflected away. Higher is better in the model because it allows in more ‘free heat’, but lower is better to prevent overheating, and I think lower is ultimately the better way to go given our climate trends. I’m leaning toward using the lower value (Cardinal 360/180) on the south and west windows and the higher (Cardinal 270/180) on the north and east.

Much more fun than picking a SHGC for glazing is picking custom colours for our front entry doors. Thanks to our kindergartener’s astute design sense, there will be a purple door!

Ventilation: Each half of the duplex will have distinct heat recovery ventilation systems. We had been mulling over whether to pay for the more expensive Paul Novus units that have better heat recovery than the Zehnder units. This makes a difference of about 1 kWh/m2 heating demand, which is not insignificant when the maximum allowable is 15. I’ve got the less efficient Zehnder units in the model now, but this dilemma is likely to resolve itself even more favorably when the new Zehnder Q-series units become available in early 2019. They have vastly improved efficiency at much lower cost than the Paul units. Whoopee.

Heating and Domestic Hot Water Heating:  We have chosen to go with Sanden CO2 heat pumps for domestic hot water heating and in-slab radiant hydronic heating on the ground floors. These are air-to-water heat pumps that use CO2 as the heat transfer medium instead of something like R410-A. This technology has so much potential because most other refrigerants have several hundred to several thousand times the global warming potential of CO2. And the thing that doesn’t get talked about (and as far as I can tell has not been studied) is that typical refrigerant-based systems leak refrigerant like crazy. Anecdotal evidence suggests that 80% of the refrigerant that gets added to a system leaks out into the atmosphere.

The limitation of CO2-based systems is that they can only do heating, whereas other refrigerant based systems can provide both heating and cooling. We’re not currently planning to add mechanical cooling and we’re hoping that by the time the climate here becomes California, we’ll have sufficient shade trees to limit our exposure.

I’ve chatted with a few people who have experience with a Sanden “combi” system, including Peter J from Cascadia Architects. He has a functioning system in his Passive House home and shared a few tips for making sure it works properly without overheating the house – like heating the slab overnight and then shutting it off during the day and having a couple of supplemental heat sources for the few very cold days.

And further to the simplicity theme: by using polished concrete floors on the ground floors, we can embed the hydronic tubing; do one concrete pour and save on other floor finishes. It also makes for a clean modern look that we quite like.

And a Bunch of Little Things: I’m keeping a running markup of all the little things that occur to us the more we stare at the drawings – like moving a toilet location; combining the laundry and mechanical rooms to remove a wall and a door; shifting a window so there is room for a single bed along one wall. So basically thinking carefully about what it will be like to live in the space and making sure it works.

We’re quickly approaching the point where we’ve firmed up the bigger system choices. I will then do another update of PHPP, after which we’ll have a very good idea how the numbers will work out. Our decision-making will then shift toward things like kitchen cabinets and countertops and away from things with an appreciable impact on energy demand.

Filed Under: Design, Featured, Performance Tagged With: passive house, Passive House construction, Passive House performance, Passive House systems, ultra low energy

To Passive House or Not to Passive House (Responding to City Comments Part 2)

February 17, 2017 by clove Leave a Comment

The city asked in their first rezoning review if we were willing to sign a covenant to seek Passive House certification. Good question and the time has come to answer it!

(Read more about Passive House and other approaches we considered.)

There are a couple of good reasons to pursue Passive House certification:

  • Understanding the nuances of the process by going through it.
  • Marketability – it’s becoming increasingly recognized and sought out by savvy buyers around here.

Because of what I do for a living, though, I am inclined to remain certification-system-agnostic. If we go for Passive House, it’s because I want to test it out. We’re not doing it because we think it’s the only way to a good building and to a sustainable future. It is a way. Focusing on passive principles, like airtightness, well insulated walls, no thermal bridging, and effective ventilation – is a very straightforward way to dramatically reduce our energy consumption and greenhouse gas emissions, and I do believe this is a critical approach to building better buildings. A house that consumes 20 kWh/m2/yr instead of the 15 required by Passive House at the end of the day is still miles ahead of a typical one that consumes 100.

I’m also very curious about the impact of occupant behavior. Could we build something slightly less than a passive house and use as little energy through conscious consumption? Would we be more uncomfortable? Is there an ideal balance that is something less than Passive House but right in our mild west coast climate? These are difficult questions to answer on a single project, but interesting all the same.

I’ve had in my mind from the beginning what I believed to be a reasonable but very high performing wall assembly: 2×4 wood frame cavity with batt insulation; plywood sheathing, weather barrier, 6” of mineral fibre insulation; rainscreen and cladding. We’re on board for a high-efficiency heat recovery ventilator (Zehnder, Paul or similar) and we’re set on good triple pane windows. We’re committed to renewables with a goal of net zero energy consumption and zero greenhouse gas emissions.

But I was not sure about other pieces like the amount of roof and below slab insulation. And I wasn’t sure how this would all add up in the eyes of Passive House. There was no way of getting around it – I had to model it in PHPP, the Passive House (giant) spreadsheet software.

In early January, I took the 3-day Passive House modeling course as a follow-up to the 5-day design course I took three years ago. I’ve since been chipping away at the model to give us more confidence about what we are prepared to commit to in our re-submission to the city.

I’m relieved to report that I am *almost* finished the model.

The first time going through a whole model for a smaller house takes at least 3 days, assuming you’ve had some training. I’m 24 hours in so far, and this includes a fair bit of head scratching, learning, looking at other examples, going back and fixing mistakes.

I would recommend to anyone who has the luxury to devote 3 whole days in a row to get your head into it; even half days are wonderful. I found two hours at a time is about the minimum to feel productive. And keep moving – if I got stuck and bogged down by something, I moved on to make progress elsewhere, then looped back after I’d had a bit of time to digest the issues, or could ask someone for guidance.

The modeling tool itself is not difficult provided you are comfortable using Excel, but it does take time to understand the intent of each entry and to follow the protocols where they exist. The most frustrating part of the modeling for me was that there are several key entries that require significant work in the background – for example, calculating total floor area, heat loss area, and domestic hot water pipe lengths – but lead to a single number entered into a single excel cell. The progress is significant but can feel small.

Here is the heart of what you get out of the model:

The software is really an energy balancing tool in which your goal is to moderate heat losses (e.g. through your walls and windows), and then balance them with gains (e.g. through people, light bulbs, appliances, as well as solar gains through windows). The remaining imbalance is your heating demand, represented by the red chunk in the ‘gains’ bar above – this is what you have to add to the space, and this is the number that Passive House requires you to keep less than or equal to 15 kWh/m2/year.

I still have a few key inputs to add, but am feeling confident that this is within reach for our project and we are likely to go for it. In the meantime, time to reclaim my personal wellness time and get outside for some fresh pre-spring air! Thanks for reading!


Filed Under: Performance, Rezoning Tagged With: energy efficient design, passive house, performance, ultra low energy

The Path to Decarbonization and Net Zero Energy

October 13, 2016 by clove Leave a Comment

We’re targeting net-zero energy consumption and zero carbon emissions in the operation of our post-project home. Say what?

Net zero energy means that, on an annual basis, we generate as much energy as we use. So unless we have an oil well on our property, we are drastically reducing both our fossil fuel consumption and our utility grid dependence. Zero carbon emissions simply means that we don’t burn any fossil fuels to operate our home.

A home could use one or more different sources of site-generated renewable energy – solar photovoltaics or solar thermal, for example. I’m keeping things simple for the moment by assuming that we will only use solar photovoltaics to generate electricity. Unless we include battery storage, we will still be drawing electricity from the grid when the sun isn’t shining or when our demand is higher than our panels can provide. But in a place like BC that has a net-metering program, we will also be feeding back into the grid when we’re generating more than we need.

So can anyone just plunk a bunch of solar panels on the roof and viola: net zero energy? Not so fast. With the amount of energy most houses use today, you’d need a much bigger roof than you have. Allow me to demonstrate with our existing house.

In an earlier post, I estimated our current annual energy consumption to be about 13,270 kWh per year, or ~120 kWh/m2 of conditioned floor area, based on our first 6 months of utility bills. This is actually an ok number given that we have three chimneys, single pane windows, and all sorts of leaks and drafts. It’s about 45% lower than the average Canadian home and on par with the Germans. We turn things off when we aren’t using them, but we also shiver through the winter with an inadequate heating system.

We now have a full year of electricity consumption data to update my earlier guestimate. Our actual one-year consumption was 13,700 kWh, or 123 kWh/m2/year. The daily consumption curve looks like this:

Full year of energy consumption for our existing house

Full year of energy consumption for our existing house

The ‘curved’ part is the energy we used for heating. If you drew a straight line across the flatter portion of the graph, the area below the line would roughly represent our non-heating energy use, which stays relatively constant throughout the year.

So that’s the energy demand side. Let’s now turn to the solar PV question.

I called up Power to the People, who will do a free, high level evaluation of the solar potential of your house, based on a google earth analysis, some rules of thumb, and an assumption that your roof is not shaded. Here’s what their evaluation spat out for our existing house:

Power to the People Solar PV Analysis

Power to the People Solar PV Analysis

If we covered our south, east, and west roofs with panels, we could generate 7150 kWh annually. This is a little over half of our current consumption. We would have to reduce our consumption by nearly half to achieve our next zero energy vision using only solar PV.

Is this even possible? The Passive House approach promises a 90% reduction in heating demand by focusing primarily on the design of the building envelope. According to my rough estimate, about 50% of our current consumption is for heating.  So it would be doable if we both dramatically reduced our heating demand by improving the envelope and found some additional ways to save. I predict, for instance, that my long hot shower habit will be curbed when our house feels warm and comfortable in the winter. We’ve also heard that people who live in passive houses do not use dryers because the heat recovery ventilator helps clothes dry so quickly.

So we think it’s challenging but doable, and our example illustrates two things:

  1. The first step must be to reduce demand through passive strategies, like extra insulation, increased air tightness, and better windows.
  2. The way you live in your house matters too! Turning off lights and electronics, limiting long hot showers and dryer use etc. The lower you can get your energy demand, the more likely you can meet your annual average with site-generated energy.

One of the most exciting prospects about following the passive house approach is that we can reach our goal while feeling WAY more comfortable and having WAY better air quality. Win win!


Filed Under: Featured, Performance Tagged With: energy consumption, energy efficient design, passive house, performance, ultra low energy

How Much of an Energy Hog is Our Existing House?

March 18, 2016 by clove 4 Comments

Our goal is to create housing for 2.5 families that uses less energy than the existing single family house. So how much of an energy hog is our existing house?

Here’s what our daily energy consumption looks like for the first 6 months we’ve lived here, starting in July 2015:

Existing house energy consumption-bigger

So…is this a lot?

Let’s do some very rough comparisons. I’ve doubled our first 6-month consumption to estimate annual consumption; converted to a per square meter metric and then compared against some other references:

  • Canadian average consumption for a household our size, kWh/square meter/year
  • Our existing house consumption, estimated, kWh/square meter/year
  • A typical German house, kWh/square meter/year
  • The first local certified Passive House (Bernhardt Passive House), kWh/square meter/year*

*We’re just talking ballparks here. It’s pretty difficult to find comparative numbers that all use the same assumptions – my intent is to show a reasonable range in potential consumption.

Energy comparison-biggest

Hey! We’re actually doing really well by our abysmal Canadian standards, and pretty average by German standards. Of course, we would expect our consumption to be lower than the Canadian average because we have the mildest winter in Canada, although it’s unlikely to result in this much of a difference on its own.

But wait – this is only part of the story.

The other part of the story is that, boy, were we cold over the winter!

Our house came with an oil furnace and an empty tank. We didn’t want to buy a full tank of oil to heat the house for a winter when we’re getting rid of this system with our renovation, nor did we particularly want to use the existing duct work. The previous owner was a smoker and lord knows what might come puffing out of those ducts. Better to let sleeping dogs lie.

Matt cobbled together storm windows for some of our original single pane wood windows, and we put plastic film on the inside of others. And we shivered through the (albeit mild) Victoria winter, with two wall-mounted electric baseboard heaters and 2 plug-in electric heaters. We moved the heaters around depending on what room we were in and closed doors of rooms we weren’t in.

In conclusion, then, our existing house isn’t an energy hog based on the way we’re currently running it, but it surely would be one if we heated to a modern-day standard of comfort.

This comparison shows very clearly the range of what is possible. I think we can hit our target compared to what a typical house in our climate consumes. And I for one am looking forward to experiencing the comfort promised by a well insulated, airtight, and properly ventilated house!


Filed Under: Featured, Performance Tagged With: energy consumption, energy efficient design, energy performance, net zero, passive house, ultra low energy

Passive House, Net Zero, or just a Pretty Good House?

August 16, 2015 by clove 2 Comments

Enerphit logoHere’s the lowdown on our current favourite approaches to achieve our project’s energy performance goals. We’re more interested in the principles than checking boxes or getting a plaque, and want to pick and choose what will work best for us. (And yes, there are other important goals like low water consumption, healthy and local materials, and creating something beautiful, but today we’re talking energy.)

  1. Passive House
  2. Net Zero House
  3. Pretty Good House

Passive House:

The Passive House standard has 3 key performance requirements:

  • Annual heating demand <= 15 kWh/M2/year. This is a 70-90% reduction over what most houses use for heating.
  • Total primary energy demand <= 120 kWh/M2/year (this is a measure of total energy consumption, including the energy required to generate and transport the energy from the source, using a single source energy factor for all of North America)
  • Air tightness, as Air Changes per Hour (ACH) <= 0.6 ACH50, as measured by a blower door test. This is about 4 times more airtight than a typical new house.

Here’s a snappy video that explains the fundamentals of the Passive House approach:

The basic concept of the Passive House standard is to focus first on the structure itself: highly insulated foundation, exterior walls, roof; airtight enclosure, and high performing windows – and then supplement with mechanical heating and/or cooling systems. So we reduce demand as much as possible first before looking at efficient ways to provide the remaining energy we need. Mechanical ventilation is also required to maintain air quality.

The requirements are performance based (focused on the end result rather than prescribing certain systems or building elements), but they do lead us to certain choices that we must make in order to meet the requirements, such as triple pane windows, very high performing heat recovery ventilators (HRVs), and thermal bridge-free construction. Equipment and windows must also be tested specifically to Passive House specifications, which can limit the available choices of certain products like HRVs.

Passive House does not require site-generated renewable energy, although it does provide a credit toward primary energy demand for on-site solar PV.

Passive House performance is modeled using PHPP, which is a giant spreadsheet that does a lot of backend calculating based on heat loss, heat gains, and local monthly average climate data.

For smaller buildings like ours, we will have difficulty meeting the standard without good unobstructed southern orientation (although there are a couple of new certification options that offer some hope – post to come). The south side yard is especially challenging because butting up against our desire to maximize south-facing windows are perfectly reasonable zoning requirements intended to protect the privacy of our neighbhours. Depending on the distance of the house to the property line, we are limited in the amount of glazing and the rooms in which we can have glazing facing the side yard.

What we do have going for us is a simple shape: both houses will basically be rectangles, which makes the detailing for no thermal bridging and a continuous air barrier much simpler (the less corners the better).

Regardless of whether we meet or seek official Passive House certification, I think the passive approach is common sense for any building anywhere, and this will form the foundation of our design approach.

Net Zero

Net zero energy means that, on an annual average basis, our project produces as much energy as we consume. Net zero carbon emissions means that we either purchase carbon offsets, or we avoid the use of fossil fuel based energy.

Can we produce on-site as much energy as we consume in a year? This will depend on three key things: the design of our enclosure to minimize energy loads, our behaviour as energy consumers, and the amount of solar PV capacity we can fit on the roof. In our case, BC Hydro allows net metering, so we can feed excess generated energy back into the grid, and draw it from the grid when we are in deficit.

Passive House does not require the use of on-site renewable energy, but it makes net zero energy consumption viable because it significantly reduces demand.

We’ll have to do some modeling to look at the solar potential of our roof in our specific location, as well as take a stab at estimating our energy demand to get a better sense of where we’re at.

I think this is a goal worth shooting for. We will design for an all-electric project with solar PV, since BC produces much of its electricity using “carbon-neutral” hydro electricity.

The Pretty Good House

The Pretty Good House is not so much a standard as a practical discussion happening on Green Building Advisor. It’s about making realistic choices based on the best bang for your buck in your climate, and still, by the way, ending up with something way better than code minimum. So not going quite as far as Passive House, but, say, 80% of the way there.

We’ve also seen a big variation in the actual energy consumption of certified Passive Houses, which reminds us of the critical importance of occupant behaviour. How does the impact of behaviour compare with the impact of a well designed home?

I like the Pretty Good House approach – and I would argue that it can lead us to a Really Good House – but it does require a sound understanding of the fundamentals. This is why programs like Passive House are great, because they work as learning tools.

So in summary, we will be applying passive house principles, striving for net zero energy consumption, and hopefully ending up with a couple of Really Good Houses. I am fortunate to work with a bunch of building science geniuses at RDH, who will help us get the details right.

Our project gives us a unique opportunity to compare an existing house retrofit to a new build on the same site, which is very exciting. There is also a new, slightly relaxed Passive House standard that was just released, designed for small houses on constrained lots like ours, so that might prove a viable option for us.

We will document our before and after energy consumption and share the results here. Stay tuned!

Filed Under: Featured, Performance Tagged With: energy consumption, net zero, passive house, performance, ultra low energy

Who is Stretch Developer?

Stretch Developer is written by Christy Love. In partnership with my husband Matt, we are challenging ourselves to create the kind of homes we want to live in and see more of in our community. Home is the incredible Victoria, BC, Canada.

Sign up!

Sign up to receive email notifications of new posts.

Recent Posts

  • New Uses for Old Wood Part 2 September 26, 2021
  • Ongoing Preparations for the Apocalypse August 13, 2021
  • Things We’ve Noticed – Energy Edition May 29, 2021
  • Passive House Suite for Rent April 17, 2021
  • Things We’ve Noticed – Comfort Edition March 14, 2021

Blogs We Like

Green Building Advisor Blogs

Musings of an Energy Nerd

Treehugger

Talk to ARYZE

Recent Posts

  • New Uses for Old Wood Part 2
  • Ongoing Preparations for the Apocalypse
  • Things We’ve Noticed – Energy Edition
  • Passive House Suite for Rent
  • Things We’ve Noticed – Comfort Edition
  • New Uses for Old Wood Part 1

Tags

budget building permit cabinet construction climate action climate change community engagement construction deep energy retrofit design design progress development permit duplex duplex + suite energy consumption energy efficient design financing financing passive house finding land food security home inspections infill low energy design neighbourhood engagement net zero passive house Passive House comfort Passive House construction Passive House construction costs passive house for sale Passive House performance Passive House performance; Sanden CO2 heat pump Passive House rental Passive House systems passive house testing performance pro forma property search tips reclaimed wood reclaimed wood construction rezoning roof row house small lot development small lot subdivision ultra low energy

Copyright © 2026 · Metro Pro Theme on Genesis Framework · WordPress · Log in


Loading Comments...